
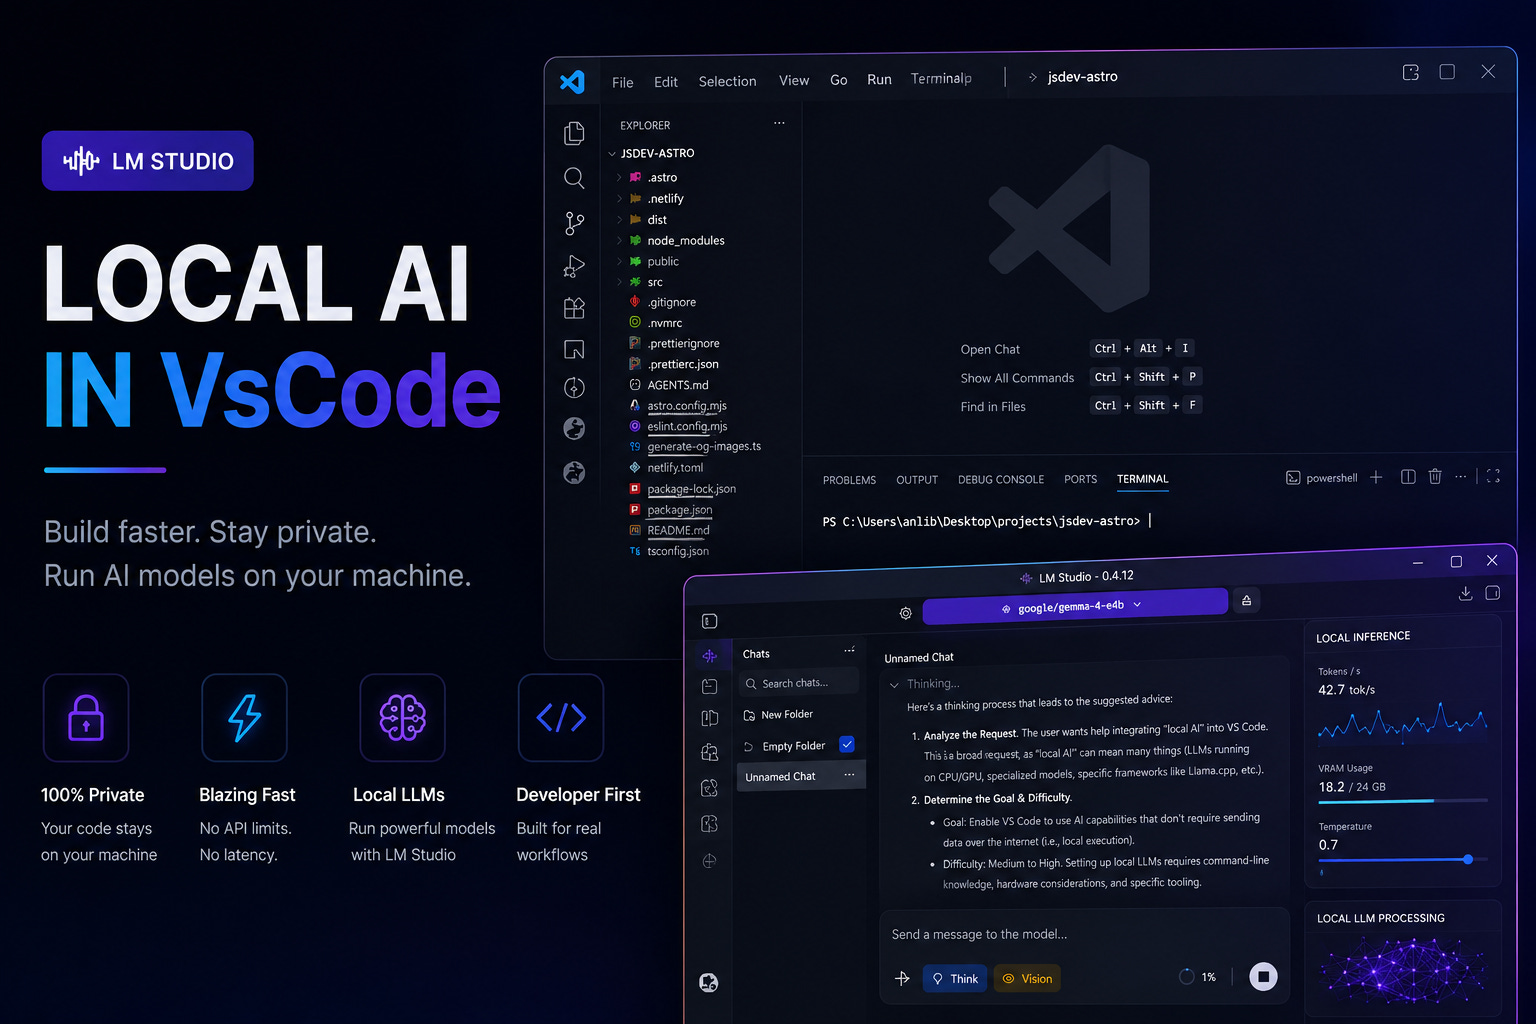
Building a Fully Local AI Workspace Inside VS Code
A practical guide to running local AI models inside VS Code using LM Studio, Cline, and offline coding workflows

AI-assisted development is rapidly shifting from cloud-only workflows to local-first environments.
Instead of relying entirely on external services, developers can now run powerful language models directly on their own machines and integrate them into their editor, terminal, and everyday workflow.
This approach offers several advantages:
private local inference
offline development
zero API costs
customizable tooling
faster experimentation
complete environment control
In this guide, we will build a fully local AI development setup using:
Why Developers Are Moving Toward Local AI
Cloud-based coding assistants are convenient, but they also introduce limitations that become more noticeable over time.
Common problems include:
subscription pricing
privacy concerns
internet dependency
API rate limits
slow responses during peak usage
lack of control over models and infrastructure
Local AI environments solve many of these issues.
Instead of sending requests to external servers, everything runs directly on the developer’s machine. That means projects remain private, inference works offline, and the environment becomes fully customizable.
Of course, there is a tradeoff.
Local language models require significantly more hardware resources than traditional developer tools.
Hardware Requirements Matter More Than Most People Expect
Running local models is heavily dependent on system performance.
A weak machine may technically load a model, but the actual experience can become frustrating very quickly. Response generation slows down, inference becomes inconsistent, and larger projects become difficult to work with.
Mid-range systems usually provide a much more comfortable experience, especially for small and medium-sized projects.
The most important hardware components are:
GPU memory
RAM
SSD speed
CPU performance
Operating system optimization also plays a surprisingly large role. Different Windows builds can noticeably affect model performance and inference speed.
Skipping the Obvious Setup
Most JavaScript developers already have:
Visual Studio Code
Node.js
npm
terminal tooling
installed and configured.
Because of that, there is no reason to spend half the article installing VS Code and Node.js from scratch.
Instead, it makes more sense to jump directly into the interesting part: building a fully local AI workflow with LM Studio.
Installing LM Studio
The next step is installing LM Studio.
Download:
LM Studio acts as the foundation of the entire local AI workflow.
It provides:
local model downloads
GPU acceleration
model management
chat interfaces
OpenAI-compatible APIs
inference servers
During installation, it is usually better to:
skip automatic model downloads
disable auto-start services
configure a custom models directory
Large models can consume hundreds of gigabytes over time, so storing them on a secondary drive is often the better option.
Example:
D:\models Choosing a Local Model
After installing LM Studio, the next step is downloading a model.
At the moment, LM Studio itself recommends the:
google/gemma-4-e4bmodel by default.
And honestly, for most developers, this is currently a pretty solid starting point.
Gemma 4 E4B is part of Google DeepMind’s newer Gemma 4 family and is designed specifically for efficient local inference on consumer hardware. The model supports:
reasoning
coding tasks
tool calling
multimodal workflows
long context windows
while remaining relatively lightweight compared to larger models.
This is exactly why LM Studio currently pushes it as the default recommendation.
For laptops and mid-range desktop machines, E4B is usually much easier to run than massive 26B or 31B models while still delivering surprisingly good coding performance.
That said, the local AI ecosystem changes ridiculously fast.
A model that is considered “the best default” today may be outdated in a few months. New open-source models appear constantly, and performance improvements happen almost weekly.
Because of that, developers should absolutely spend time researching newer models later instead of treating the default LM Studio recommendation as permanent.
Right now, though, Gemma 4 E4B is a very reasonable place to start.
Configuring Virtual Memory
Systems with limited RAM may run into memory allocation issues when loading larger models.
Windows virtual memory can help stabilize the environment.
Open:
System Properties → Performance → AdvancedThen configure virtual memory as:
System managed sizefor all drives.
After applying the changes, Windows will usually require a restart.
This simple adjustment can significantly improve stability on weaker systems.
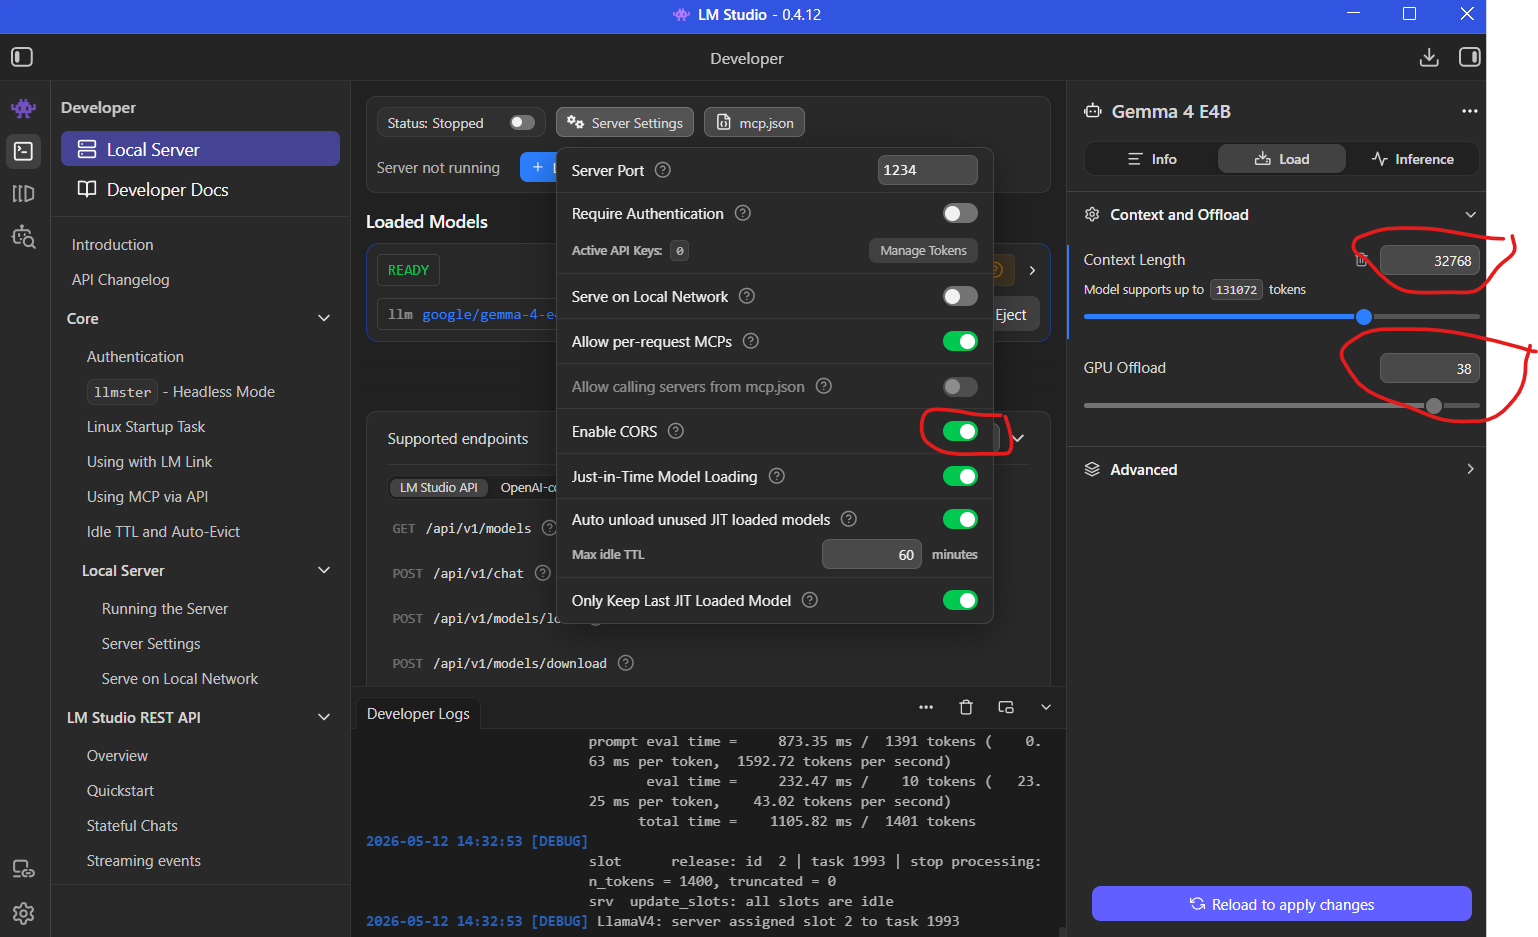
Understanding Context Length
One setting that many developers overlook is context length.
Modern coding workflows benefit heavily from large context windows because AI models need to understand multiple files simultaneously.
A common configuration is:
32768tokens.
Larger context windows help models:
preserve conversation history
analyze larger codebases
understand project structure
generate more coherent edits
For AI-assisted development, context size often matters just as much as model size.
Testing the Model Before Integration
Before connecting the model to external tools, it is a good idea to verify that everything works correctly inside LM Studio itself.
A simple prompt is enough:
What are tokens in language models?If the model responds normally, the inference pipeline is working correctly.
At this stage, developers can also estimate generation speed and determine whether the hardware configuration feels comfortable enough for daily work.

Turning LM Studio into a Local API Server
One of LM Studio’s most useful features is its OpenAI-compatible API server.
Inside the Developer section:
Load the model
Verify context settings
Enable CORS
Start the local server
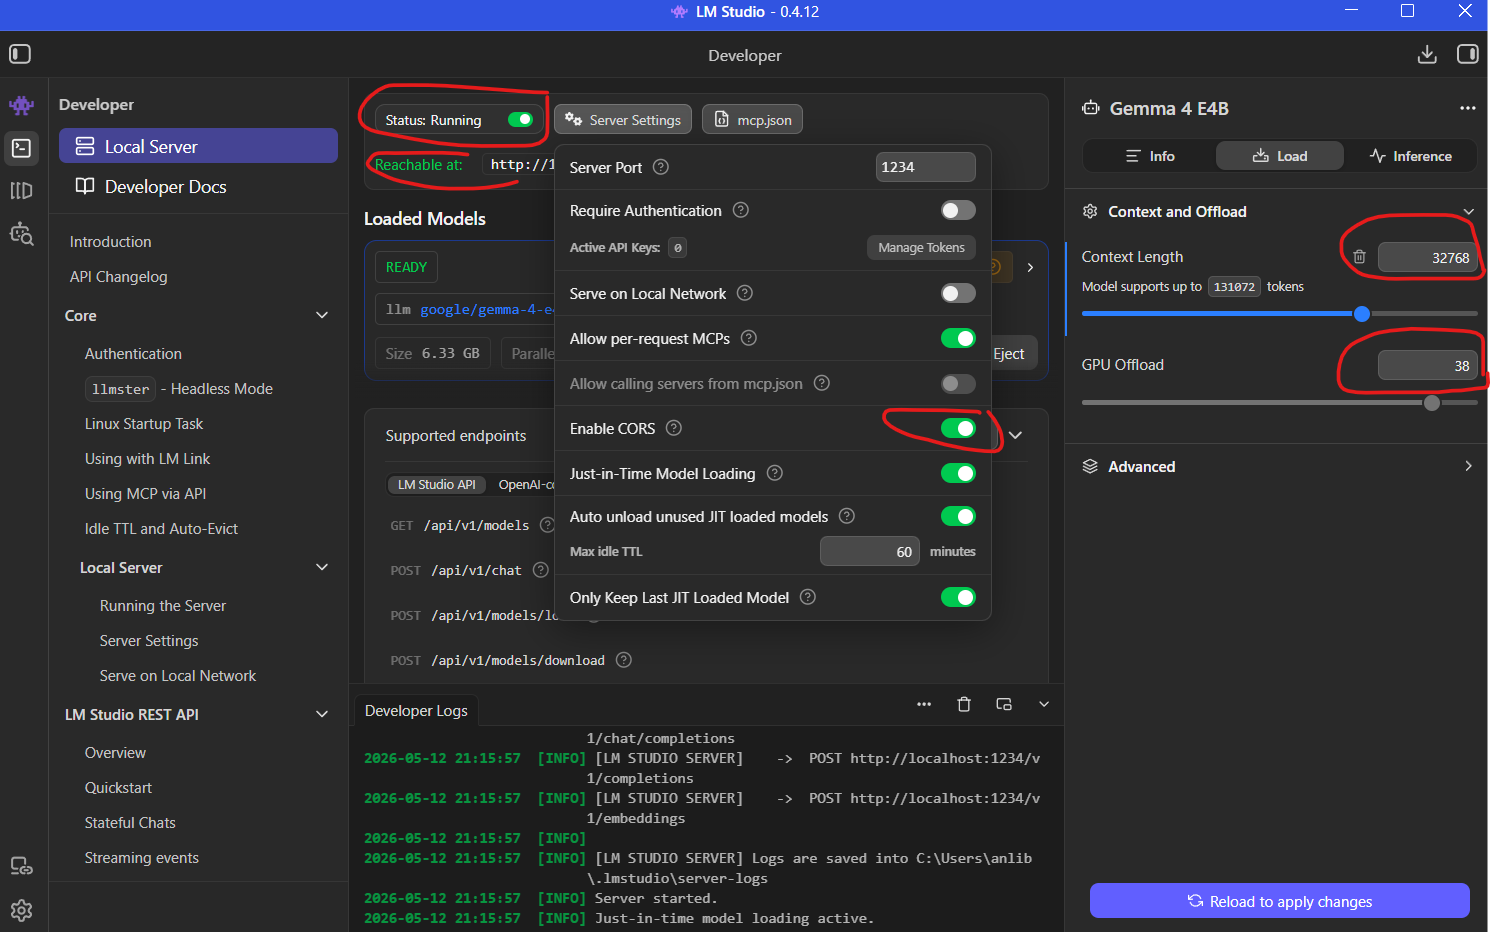
Once enabled, external applications can communicate with the local model exactly like they would with a cloud AI provider.
This transforms the machine into a fully local AI backend.
Installing the Cline Extension
Now it is time to integrate AI directly into the editor.
Inside VS Code Extensions, search for:
ClineInstall the extension and grant workspace trust permissions.
Unlike traditional autocomplete plugins, Cline behaves more like an autonomous development agent.
It can:
execute terminal commands
create files
refactor projects
install dependencies
update configuration files
explain errors
This makes the workflow feel very different from traditional autocomplete systems.
Connecting Cline to LM Studio
Inside Cline settings:
Choose:
OpenAI CompatibleThen configure the local endpoint:
http://127.0.0.1:1234/v1The /v1 suffix is important because LM Studio exposes an OpenAI-style REST API.
The API key field can contain any placeholder value since everything runs locally.
Finally, copy the model identifier directly from LM Studio and paste it into the model configuration field.
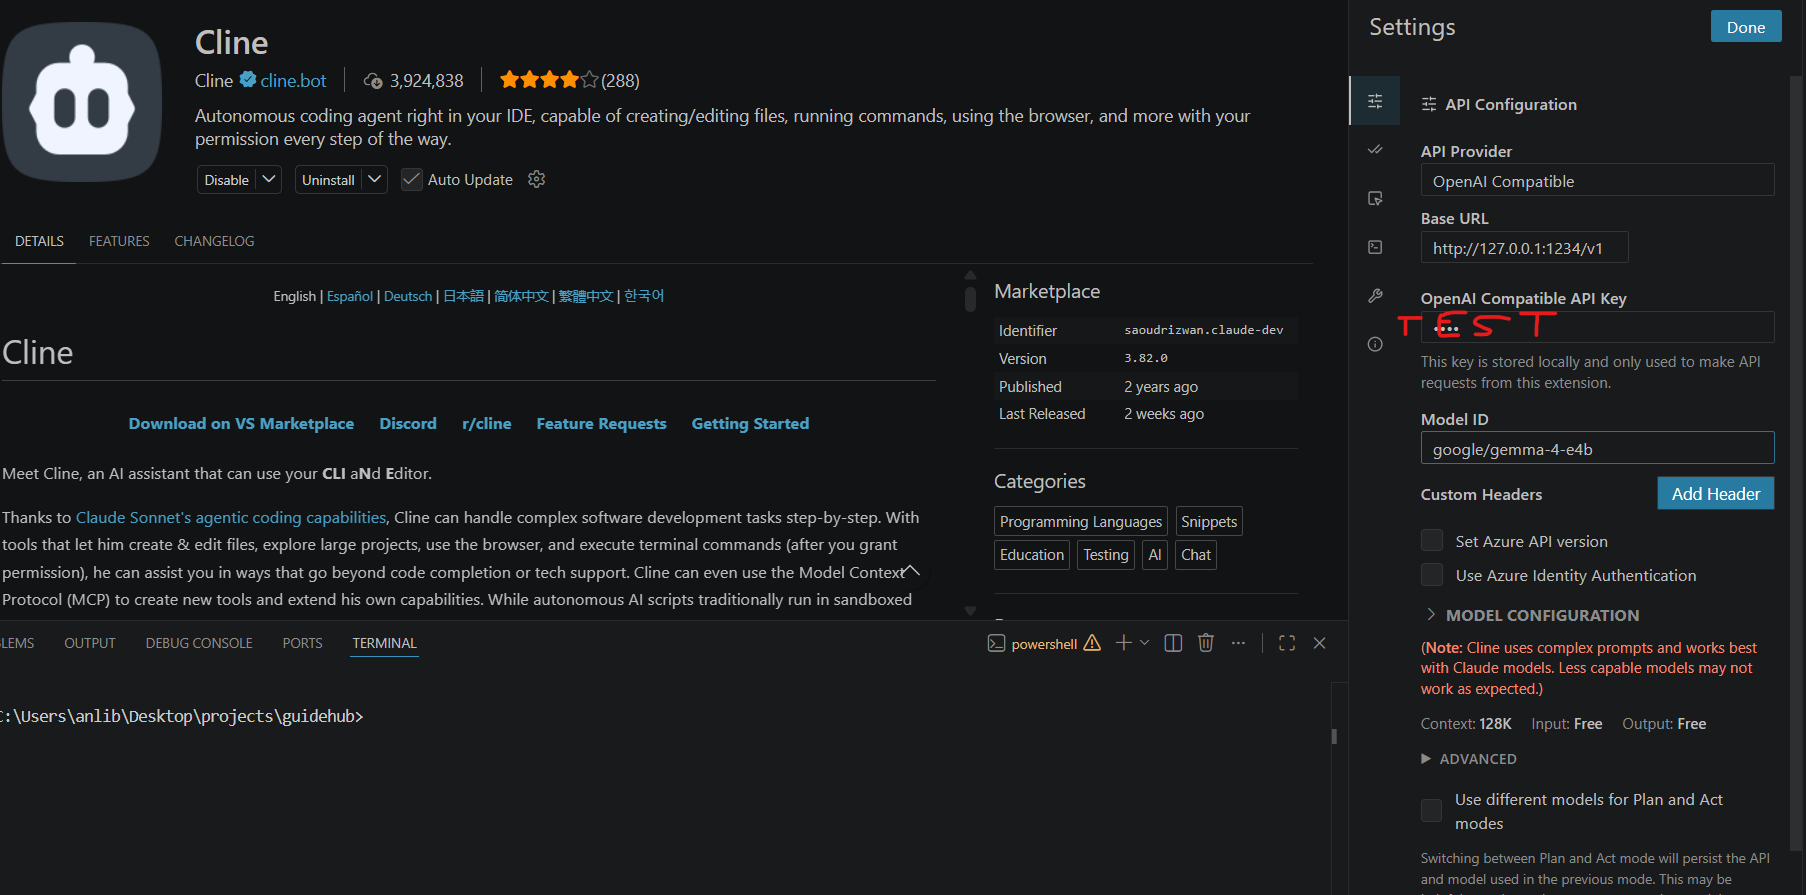
Once connected, VS Code gains direct access to locally running AI models.
Working with AI Coding Agents
AI coding agents work differently from traditional assistants.
Instead of only suggesting snippets, they can actively interact with the project itself.
For example, an agent can:
initialize projects
install dependencies
generate files
modify configuration
launch development servers
refactor existing code
The most interesting part is transparency.
Every command, file change, and generated edit remains visible to the developer.
This makes it much easier to supervise the workflow and intervene when necessary.
AI Agents Still Require Supervision
Even powerful models make mistakes.
Incorrect assumptions, outdated configurations, and broken project structures still happen regularly.
Sometimes the AI fixes its own mistakes automatically. Other times, manual intervention becomes necessary.
This is why modern AI workflows work best when developers treat the model as a collaborator rather than a replacement.
The quality of results depends heavily on:
prompt quality
project constraints
developer supervision
iterative refinement
Developers who expect perfect output from a single prompt usually end up disappointed.
Better Prompts Produce Better Results
One of the biggest differences between mediocre AI workflows and excellent ones is instruction quality.
Specific prompts dramatically improve reliability.
For example, instead of writing:
Migrate styles to Tailwindit is much better to write:
Migrate all styles to Tailwind CSS v4
and remove old CSS files.
Version numbers matter.
Explicit constraints matter.
Clear expectations matter.
The more structured the prompt becomes, the more predictable the output becomes.
Local AI Works Best for Repetitive Development Tasks
AI coding tools are especially effective for:
scaffolding
repetitive refactoring
style migrations
configuration generation
boilerplate creation
documentation
debugging assistance
These systems are not replacing software engineers.
They are reducing friction.
For solo developers and small teams, this can dramatically accelerate everyday development work.
Final Thoughts
Local AI development has evolved from an experimental niche into a genuinely practical workflow.
With tools like:
LM Studio
Cline
Visual Studio Code
developers can build fully private AI-powered workspaces directly on their own machines.
The ecosystem is still evolving rapidly, and local models still lag behind the most advanced cloud systems in some areas. But the gap is shrinking much faster than many people expected.
For developers willing to experiment, local AI already offers a surprisingly capable and highly flexible development experience.